![]()
Want some top tips about kayaks and all things kayaking then you have come to the right place. This is for those that want to know the basics about kayaks, and, those that need that boost of confidence to get out on the water and experience the thrill of being on the water, whether that be fishing, or just having fun with the family.
Featured
- What to wear for Winter Kayak Fishing
- Basics of Kayak Fishing
- Kelped
- Kayak Fishing
- Choosing a Kayak
- Soft Bait Fishing Basics
- Paddle Length Guide
What to wear for Winter Kayak Fishing

Some of the better inshore “Big Fat Winter Snapper” fishing can be found during the cooler winter months of the year. An added advantage is that there are not as many “Fizz” boats around scaring off our fish!
It is imperative to dress appropriately for the conditions on the water at all times whilst kayak fishing. During the winter, you may well start off quite “chilly”, but will soon start to warm up after a few dozen paddle strokes. Dressing with layers is the key, using clothing that will block the wind and keep you warm even if they get wet. You may well start out with an early morning frost, but temperatures on a clear still winters day can easily rise to 16 - 18 degrees.
Extreme care needs to be practised when changing into or out of your layered clothing whilst on the water, as you will need to take off your PFD to do so.
If you are in rough or unsafe conditions, you may well be better to paddle to a sheltered location, or even go ashore to alter your clothing requirements. Remember also, that the water temperature will drop significantly, usually around to around at least 10-14 degrees Celsius in Northland. Therefore you have to not only take extra care not to end up in the drink, but you have to have the clothing and skill to get yourself back onto your kayak pronto should you take an unexpected dip. Even a short length of time in the cold water will sap your strength rapidly. If this happens to you, get yourself back ashore, dried off and into your change of dry clothes (which you should always have) as soon as possible.
Tops
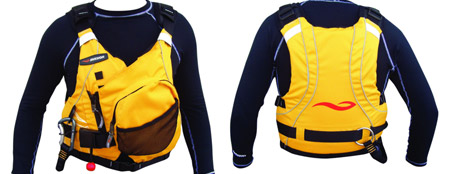
The coldest months are usually June, July and August. We recommend a thermo-Lycra or thin neoprene top, with perhaps a Merino singlet underneath for those extra cold early morning starts. You can then wear a good quality Paddle/Spray Jacket with rubber seals at the wrists and neck. This will give you good warmth against the wind chill, which you should always take into account. Lastly of course, will be your PFD which will also contribute towards your warmth factor.

Adrenalin PP Thermal Long Sleeve Top - The unique combination of Polyester and Spandex provides great insulation wet or dry. And with it 170% +4 way Super-stretch it not only feels extremely comfortable it allows you to perform with it acting just like a second skin.
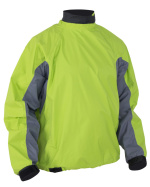
NRS Endurance Jacket - The waterproof, windproof NRS Endurance Jacket lets you paddle in comfort, even in windy, splashy conditions. Kayakers looking for technical performance will love this paddling jacket.
- Waterproof, breathable HyproTex 2.5 fabric lets excess heat and moisture escape, keeping you comfortable.
- Action-cut design gives you room for layering underneath and won't restrict your paddling motion.
- Adjustable urethane neck and wrist closures help keep water out.
- Fully taped seams keep water from sneaking through the stitching.
- Convenient splashproof, sleeve pocket keeps necessities close at hand.
- Shock cord waist tightens easily with a barrel-lock to help prevent ride up.
Bottoms
There are several options for dressing from the waist down. We find that for our Northland conditions, a pair of thermo-lycra pants, with a pair of paddle pants over the top, and a pair of high neoprene boots will keep you “toastie warm”, and more importantly - dry! With the NRS Boundary shoe (Kayaking Boots), purchase a pair with enough room to wear some thick woollen socks with them. Because of the height of these boots, and the calf seal, you should easily be able to launch with a little care, ensuring that you keep dry. There is nothing worse than cold wet feet inside short booties when you are winter fishing.


PP Thermal Long Pants - The unique combination of Polyester and Spandex provides great insulation wet or dry. And with it 170% +4 way Superstretch it not only feels extremely comfortable it allows you to perform with it acting just like a second skin.
NRS Rio Pant - Combine the splash proof Rio Pants with any waterproof jacket for full-body splash protection. The wind proof pant will keep you dry and greatly reduce the effects of evaporative cooling.
Durable urethane-coated 210 denier nylon oxford is cut big to allow layering for extra warmth.
- Waterproof and windproof for those days when the sun isn't shining as bright.
- Shock-cord waist fastens with a barrel-lock enclosure.
NRS Endurance Drypants - Made from ultrabreathable, waterproof 2.5 HyproTex fabric, the endurance pant are comfortable and durable.
Boundary Shoe - The NRS Boundary Shoe is knee high, waterproof and warm. Great for those wet, soggy put-ins.
DO NOT EVER...
Wear a Swandri Top, Waders, or Gumboots on your kayak!

"Be SAFE be SEEN”. These Hi-Visibility flouro coloured hats are practical for keeping the sun off, and most importantly prevent you from being turned into a “Judder Bar” from that speeding “Fizz” boat.
Head
As much as 40 % of heat is can be lost through your head. Until the day warms up, consider using a Flouro coloured Beanie perhaps with a face buff, and then change to your Flouro coloured hat when it gets warmer. From a safety perspective wearing a fluro item on your head is essential


Hi-Visibility Beanie Fleece - hat for those cold days 100% Polyester Has pull down mask for warmth
XAX Glowarm Beanie - Hi-Viz polar fleece Glo-Warm Beanie Winter warmth 325 Polyester polar fleece One size fits all
Uveto Kalahari Hat - This lightweight, adjustable head covering can be worn in a number of ways to protect the wearer from harmful UV rays.
Features:
- 50+ UPF rating
- Deep curved peak provides good shade over eyes
- Adjustable head strap to fit all sizes
- Releasable back panel for improved ventilation
- Patented covered vents on sides of head section help keep wearer cool
- Lightweight, cool and comfortable to wear
- Can be secured in front of the face to protect from reflected and scattered UV, wind and flies!
- Easy wash and wear care
- Great for Fishing, Kayaking, Sailing, Hiking etc.
- Packs away easily when not in use
Uveto Tanami Hat - This lightweight, comfortable broad-brim hat with generous neck flap helps protect from harmful UV radiation
Features:
- Max. 50+ UPF rated Microfibre fabric
- 8.5cm brim gives good shade over eyes and face
- Long neck flap ensures extra protection for back of neck and ears
- Lightweight, cool and comfortable to wear
- Can be secured under chin on windy days
- Great for fishing, Kayaking, Hiking etc.-
- Easy hand wash in cold water – quick dry fabric
Hands
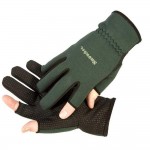
Cold knuckles and fingers can be very discouraging, so again it can be a good idea to start off with a good pair of neoprene gloves, and change to lighter more versatile gloves once the day warms up, or as need be for handling your fish and fishing gear.


NRS Rogue Glove - The perfect blend of warmth and flexibility, the NRS Rogue Glove is ideal for any type of watersport under a wide range of conditions.
2-mm neoprene core with titanium laminate adhesive keeps you warm yet remains thin enough to preserve manual dexterity.
Fully taped outer seams coupled with neoprene cuffs at the wrist help seal out water, maximizing warmth.
The grippy pattern on the palm gives you a sturdy hold on your paddle.
Snowbee Neoprene Glove - A neoprene glove with a Nylon Jersey knit palm with rubberised ‘dots’ for extra grip, allowing the gloves to be kept on when fishing or shooting. The tips of the thumb and index finger are left exposed to allow tying of knots, or loading, without removing the gloves.
Uveto Sun Safe Gloves - Designed as a multipurpose fingerless glove, UVeto’s Sun Gloves protect the back of the hand while giving the wearer added grip on the palm.
Features
Multi- purpose fingerless for maximum dexterity
Maximum UPF+Rated Lycra backing
Sure grip palm patch
Fully washable – dry soft
Excellent protection for tennis, golf, bowling, driving, cycling, hiking, any water sports and most outdoor recreation
You will find all these products instore at Sportsmans Choice - the Home of
Northland Kayaks
Basics of Kayak Fishing
Kelped
By John Waldron
Kayak fishing over “Kelpie” areas using soft baits can often produce some serious “moochers’ ( good sized snapper).
These Moochers exist though, because they are cunning!
Often, a solid hook-up will be followed by a strong “line-peeling” run, and then…nothing. The angler will think “What’s that funny feeling on the line?” Which is often followed, by the line going slack! At this stage the angler will likely be thinking “Darn!, I’ve lost him, and he was a beauty!” He will then proceed to retrieve his line, only to find it “come up solid”. “Double darn”, thinks the angler, “Not only have I lost the fish, but he has fouled my hook on the bottom!” He will then proceed to try and break the hook off the bottom, or break the line, so he can re-rig and start again. But then… the line starts pulling back!!! “Holy heck! The fish is still on, and he’s taken me through the kelp!”
What the angler does next, determines if he catches a good fish, or ends up with another “The one that got away story”, and has to re-rig his line.
Yes of course there is a certain amount of luck involved, after all the angler has already had good luck in hooking a good fish, and bad luck that he’s been kelped.
What comes next will be a good test of the angler’s terminal tackle, and his knot-tying ability.
Now no two “Kelping” situations are ever the same, and what you do one time to retrieve that cunning old Moocher, may not work the next time.
This is where that invaluable teacher called experience comes into play.
Depending on the “feel” of the foul, and the size of the fish, you can sometimes maintain as much pressure as you dare, and drag the fish back out through the kelp the same way he went in. This method however, is the most likely to result in a “bust off”.
A recommended method, is to put your bail arm over, (or if a free-spool reel – flick it out of gear) so there is absolutely no pressure on the fish. The theory being, that the fish will think he has gotten away, and will swim” your line out for you. However, if you put the pressure back on too soon, he will just kelp you again!
A very recent experience I had, truly tested my patience, as after trying these two methods, my moocher still had my line entwined through some serious kelp.
I then proceeded to use a combination of these methods, where as I pulled the fish in until he came up tight, and then let him run with a lighter drag. Repeating this process, I proceeded to use my near-new Berkley 14lb Gel-spun Fireline braid to “saw” through the kelp. This was my theory, and on this occasion it worked, resulting in a 4.6kg dark coloured “kelpie” snapper.
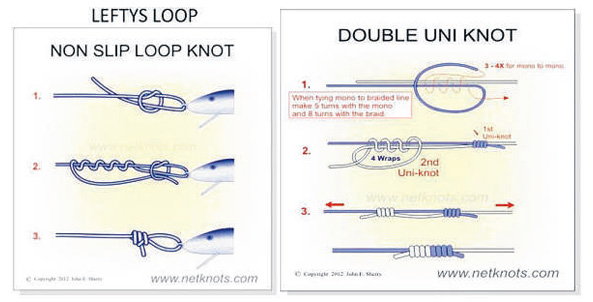
The soft bait rig on this occasion had terminal tackle (the tackle that goes in the water), consisting of the afore mentioned braid, with a one metre 25lb Berkley Vanish fluorocarbon trace. The trace is tied directly onto the braid, with a slightly amended version of the Yuccatan knot. The trusty “Lefty’s Loop” knot was used to tied the Berkley Nitro 1/4oz 1/0 Jig Head to the trace.
These knots are always given a good test after tying, which is just as well, as on this occasion, I gave my rig “death”, working to retrieve this fish.
This fish took the best part of 15 minutes to land, but most of that time he was in the kelp.
Ergo- patience is an essential ingredient in these situations, which admittedly, can be very difficult, especially if you’ve been fishing for some time without a bite!
Some anglers will have noted the size of the jig head used (1/0). For those that don’t know, this is quite small, considering the standard jig heads go up to 7/0. This is a tip that I picked up from a very successful kayak soft bait fisho in the Bay of Islands.
The theory is, that the smaller jig head is easier to “hide” in the soft bait, giving it a more natural appearance, which the bigger snapper tend to “wolf” down. This invariably tends to result in a more solid hook up inside their mouth, with less chance of the hook pulling, which is crucial, if you find that you’ve been Kelped!
The Berkley Nitro silver jig heads seem to be less prone to being crushed by a strong snappers jaws than some of their “shiney” counterparts.
The other advantage of using smaller jig heads over kelpie areas, is that is less like to foul in the kelp, and more likely to break free from the kelp than a larger jig head.
In summary, know and practise your knots, use good quality terminal tackle, be patient, and good luck!

4.6kg snapper dragged through the kelp at Tutukaka 19.01.14
Kayak Fishing
By John Waldron
Kayak Fishing is one of the fastest growing sports in the world.
It has certainly taken New Zealand by storm, and an awful lot of kiwi anglers are making the switch to Kayak Fishing.
For the tried and true kayak fisher-folk, Kayak Fishing is a no-brainer. The advantages over other fishing methods are significant:
- COST! Once you are fully set up, your only cost is getting to your launch site. The same as land based fishermen.
- Re-locating! Have you ever been shore fishing and want to re-locate to a better fishing spot? Get a kayak!
- Launching! No Queuing at a boat ramp to get in (or out) of the water. Infinite places to launch a kayak safely from the shore on our fantastic coastline.
- Maintenance! A quick hose-down, and maybe a scrub, and you’re done!
- Stealth! Kayak Fisher-folk enjoy great success, and stealth is one of the main reasons. It’s amazing how the fish will sometimes “go off the bite”, when a “fizz boat” turns up! We are able to “sneak up” on our prey, and because of the limited noise and shadow from a kayak, the fish do not get “Spooked”.
- Health. Any exercise is good for you, and Kayak fishing caters to all fitness levels. The saying “Fish your Feet first”, is exemplified with kayak fishing. Therefore, you do not need to paddle a long way to get to prime fishing spots. Some of the best fishing from a kayak can be found easily within 500 meters of where you launch. We do have the serious Kayak fishermen, who have been known to paddle 10 kilometres (plus), offshore, to get to a favourite fishing ground. These fishermen are very well geared up in terms of safety, and have never had to call on the Coast Guard because of a flat battery, or because they have run out of fuel!
- Eco-Friendly. The only emissions known to come from a Fishing Kayak, has been some serious expletives when the angler “drops” a good fish.
- Exploring! You are able to explore places that are impossible to get to from the shore, and some places that other vessels are unable to access.
There are a multitude of options available for kayak fishermen, with some of the later model SOT (Sit On Top) fishing kayaks, giving an impressive layout of rod holders, and fishing systems, specifically for Kayak Fishing.
The cost of setting up your fishing kayak can range significantly, depending on how serious you are about kayak fishing, and to what extent you wish to “kit up” your kayak.
Regardless, it is still considerably cheaper to buy and set up a Fishing Kayak, than a powered trailer boat.
When purchasing a Fishing Kayak, your Specialist Kayak Fishing Store will be able to supply you with everything you will need. Listed below are the items you need to consider, to be safe, successful, and to enjoy your kayak fishing:
- Fishing Kayak (obviously), with a Seat and paddle.
- PFD (Personal Floatation Device), for kayaking. Needs to “lock” on to your torso, and be unrestrictive for paddling.
- Paddle Leash. (A safety issue) Without one, you could end up – “up the creek without...”
- Fish Stringer. For securing your catch to your kayak.
- Drift Chute. To slow your drift down for fishing in windy conditions.
- Kayak Anchor. For anchoring your kayak.
- Running Rig. For the safe deployment and retrieval of your Drift Chute or anchor.
- Insulated Well Cover. To keep your catch cool on sunny days.
- Chill Pod. An alternative to the Insulated Well Cover, to keep your fish in pristine condition.
- Kayak Trolley. For transporting your kayak between your vehicle and the water’s edge.
- Rod Leashes. Kayakers have a saying – “leash it or lose it.” Some discovered this out at considerable expense.
- Fish Finders & Chart Plotters. These can easily be fitted to your Fishing kayak, to enhance your success at Kayak Fishing.
- Gaffs & Nets. Essential for landing that “Fish of the day!”
- Roof Rack. There are various systems available, for transporting a single, or several kayaks.
- Clothing, Hats, Gloves: Your local Kayak Fishing Specialist will have a range of specific Kayak Clothing available, and will recommend the most suitable for your needs.
Most essentially, Kayak fishing has not only been proven to be a very successful way to go fishing, but it is an absolute “truck-load” of fun.
Choosing a Kayak
By John Waldron
A lot of folk love the idea of the adventure and freedom that kayaking can give, but just don’t know where to start.
The following questions should help you to decide which kayak is better for your particular needs:
- What do you want to use the kayak for?
- Who will be using it?
- Where do you want to use it?
- What is the users experience level?
- What is the weight and height of the user?
- Have you got a budget you need to work with?
These questions may seem obvious, and can of course have a large variety of answers; however they are important, so that you don’t waste your time considering a large variety of kayaks, which may leave you totally confused and give up the kayaking idea before you even get on the water!
There are two basic types of kayaks:
1. The Sit in kayak, (often referred to as a “Sea Kayak”), is usually used for much longer sojourns, and expeditions. Because of the dynamics of the paddler having a much lower centre of gravity, these kayaks are generally longer and narrower than S.O.T. kayaks. Because of this, they are considerable faster, and easier to paddle over a long distance. This type of kayak is generally suited to the more experienced paddler, although we all have to start somewhere, and if this type of adventure kayaking appeals to you, be sure to see us for advice on a good “Sit In Kayak”, that’s not going to “tip you out” on your first trip.
2. Sit On Top Kayaks (S.O.T.) are generally easier to use, and great fun for all. There are models designed specifically for Fishing, Surfing, Tiki-touring, or a combination of all the above. Because of the large variety available, be sure to visit Northland kayaks, for professional advice that ensures you purchase the kayak which most suits your needs.
S.O.T. “Fishing Kayaks” alone, have a large variety available. Features to look at when considering these kayaks are:
- Weight
- Length
- Stability
- Lay-out
- Rudder (or not)
There are also many other minor factors to consider which may make a difference to your personal preferences.
S.O.T. Surfing, touring, and “muck-about” kayaks fall into the same category of requiring informed advice. This is why you should always speak to an unbiased kayak specialist, to ensure that you purchase a kayak that is going to serve the purpose that you have envisaged, giving you fun and enjoyment on the water, and most importantly – keeping you safe!
Be aware of all your available options, as too often kayakers who have purchased a kayak are heard to say: “I wish I had known about this other model of kayak”…
If you are still not sure, “test drive” the options you have narrowed down.
The most important factors for you to consider, are ease of use, comfort, and stability. If you feel happy and safe on a kayak, you are most likely on the way to making your kayak selection.
We are fortunate that we have some top quality kayaks made right here in New Zealand, designed for our conditions, by some highly dedicated and experienced kayak manufacturers.
Once you have settled on the kayak to serve your needs, you will need to consider the following equipment to keep you safe, which will help to enhance your kayaking adventures:
- Kayaking PFD (Personal Floatation Device) – This is essential!
- Paddle Leash – Also essential!
- Hi-Vis Specialist Kayak clothing – Highly recommended. (Be safe -be seen)
- Kayak Trolley – This makes getting your kayak to & from the water’s edge a whole lot easier
- Kayak Roof Rack Systems – Several systems are available for easy kayak transport.
Always check the weather forecast before venturing out, even if you only plan to venture out close to shore, and avoid kayaking in moderate or strong winds. At the very least, a windy day can take the enjoyment out of your trip.
Soft Bait Fishing Basics
By John Waldron

This article is for those who want to learn to fish with soft baits, but don’t know where to start.
An ideal first soft bait rig would be a two-piece 214cm carbon rod, around the 3-7kg or 6-8kg rating, with a light spinning reel, 3000 to 4000 size. Brand preference will likely come into your decision, but is unlikely to make much difference to your catch rate. You can purchase a reasonable soft bait set (with braid) from $99.90, but you would be wiser to purchase a better quality set priced at about $200 to ensure you have a better chance of landing that XOS snapper, which will come along, once you master the art of soft bait fishing.
A good quality spool of 4.5kg to 6kg gel-spun fishing braid is essential. Your better fishing tackle retailerswill supply this with the reel already spooled with mono and "Top-Shot" with braid. This will save you the expense of filling your spool with braid you’ll never use.
The reason for using braid is because it is much thinner than monofilament fishing line of the same strength, and it has no stretch. This enables you to constantly remain in touch with your bait, feeling even the slightest nudge. It also is helpful that the thinner line cuts though the water better, which enables you to use a lighter weight, and helps you to remain in the strike zone longer.
There are bright coloured braids available, which are very helpful to enable you to see the placement and angle of your line. Just as essential is a good quality Fluorocarbon line for your trace. Fluorocarbon has the same light refraction as water, which renders it virtually invisible in the water. The other even more important characteristic of Fluorocarbon is its abrasion resistance, which enables you to fish with a lighter trace than if you were using a monofilament trace.
Most essential is learning to tie the "Lefty’s Loop" knot. This is by far the easiest knot you will ever learn to tie. It is used to tie your jig head on to your trace, and it makes a considerable difference to the presentation of your bait. It locks on to itself, creating a loop which enables your jig head to swing freely, which enhances your soft bait presentation. It does pay, however, to re-tie this knot after a good fish, as with severe strain combined with the free movement allowed, it can wear through on your jig head.
Attach your trace to your main line with a good braid to trace knot, such as the "double uni knot". This will allow you to wind your jig head with soft bait attached closer to your rod tip, making it a lot easier to cast.A good braid-to-Fluorocarbon trace knot will run through your rod guides without catching.
Presentation of your soft bait to the strike zone will depend upon water depth, tidal flow, and your boat’s drift rate. Once you have assessed these, you can then decide what weight jig head to use. Ideally, you want to use one as light as possible, but not so light that you are unable to get your bait to, or keep it in the strike zone, for any length of time. The strike zone for snapper is usually with in a metre or two of the sea bed. A good fish finder will show the bottom contour.
There are a large majority of soft baits available, which can become daunting. There are two basic types of soft baits. The more common ones are biodegradable soft baits, which are mostly the Berkley Gulp soft baits. This is a good soft bait for starting off, and still a favourite of many fishermen. As you become more accomplished, you could try a non-biodegradable soft bait, which does have certain advantages over its competitors, especially when there are pesky Leatherjackets around. One of the more successful of these is the "Z-Man" soft plastic baits.
With soft bait fishing, one of the biggest mistakes newbies make is that they try too hard. Yes, the secret is to keep your soft bait moving (in the strike zone), but not too much, especially if you are targeting snapper. Some of the better snapper have been caught while the rod was in the rod holder with the vessel slowly drifting… Soft Bait fishing from the shore, or from an anchored vessel, can also be successful but that’s another story...
Paddle Length Guide
Paddle length is really a matter of personal preference. Go with what feels best for you. Keep in mind that a longer paddle tends to be necessary if your kayak is wide or if you’re more comfortable with a slower paddling stroke.
The following chart makes a good starting point for recreational paddling:
Paddler Height
152 - 160cm (5' - 5'3") - 210 -22cm paddle
162 - 170cm (5'4" - 5'7") - 210 - 230cm paddle
173 - 180cm (5'8" - 5'11") - 220 - 230 cm paddle
183 - 190cm (6' - 6'3") - 225 - 240cm paddle
193 - 200cm (6'4" - 6'7") - 230 - 240cm paddle